Handle callbacks in ServiceNow
Agents receive and manage callbacks entirely in the ServiceNow workspace. Genesys Cloud handles callback routing and queue behavior.
Receive a callback alert
When a callback interaction is routed to you:
- A callback notification appears in the ServiceNow workspace.
- Select Accept or Reject.
- If you decline, the callback is reassigned according to your queue configuration.
Place the outbound call
After you accept a callback:
- The callback actions record tab opens automatically.
- If the customer has multiple contact numbers on file, select the number to dial from the drop-down list.
- Click Call number.
An auto-dial countdown timer displays, based on your queue configuration. The call is placed automatically when the timer expires.
Transfer a callback
To transfer the callback instead of calling the number directly, click the icone next to Call number, and then select Transfer callback. You can perform a blind transfer to another queue or agent.
You can also transfer during an active call which could be blind or consult transfer that will be available from the ServiceNow call controls.
Cancel or close a callback
To cancel a callback before the call is placed, select Close Callback. Wrap up code is invoked according to your queue configuration.
After you complete the call and select the wrap-up code, click Close Callback. If you don’t close the callback manually and the queue is configured to close it automatically, the callback is closed in the ServiceNow workspace when the set time expires.
Schedule a callback for a customer
To schedule a callback for a specific date and time:
- On the interaction record of an active call in ServiceNow, click Genesys Schedule Callback.
The Genesys Callback Schedule widget opens.
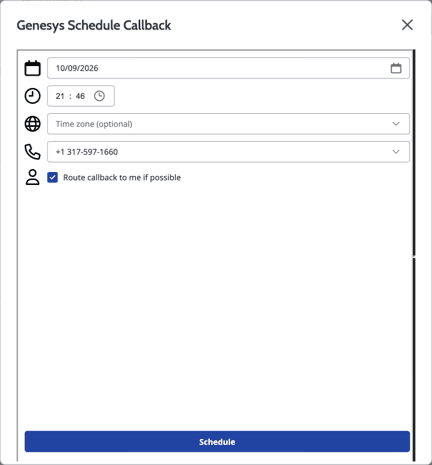
- Enter the following details:
- Preferred callback date and time.
- Customer contact number.
- (Optional) Time zone.
- (Optional) Select Route callback to me if possible.
- Click Schedule.
[NEXT] Was this article helpful?
Get user feedback about articles.