Set up routing of cases and case tasks in ServiceNow CSM Workspace
- Genesys Cloud CX 1, Genesys Cloud CX 2, or Genesys Cloud CX 3 license with Work Automation Add-on in the Genesys Cloud org.
- Install and configure the latest version of the Unified Experience from Genesys application in ServiceNow.
The Unified Experience from Genesys and ServiceNow integration intelligently routes cases and case tasks to the most appropriate agents based on AI-driven evaluation of skills, availability, and capacity. To enable case and case task routing, administrators must configure work automation using workbins and worktypes, and assign the necessary permissions for agents to access and process work items in Genesys Cloud.
To enable externally routed cases in ServiceNow using Genesys Cloud, choose one of the following two configuration options:
- You can leverage the existing Case table, service channel, and queue, and with minimal customization set up the routing of cases and case tasks.
- Create a custom service channel and queue, and optionally an extended case table, which is recommended for organizations that need to route different case types separately or apply more granular control over assignment logic.
The following steps describe how to create service channels and queues for case and case task routing in ServiceNow; however, you can adapt these procedures as needed to use your existing ServiceNow configuration.
To process cases and case tasks routed from ServiceNow, add work automation in Genesys Cloud. A basic configuration of work automation involves creating custom attributes for work automation, creating workbins, and defining worktypes.
Add the following two attributes in the schema that defines your workitem for routing cases and case tasks from ServiceNow:
sn_case_idsn_work_item_id
Create custom attributes for work automation
- Click Admin.
- Under Work Automation, click Custom Attributes.
- Click Menu > Orchestration > Work Automation > Custom Attributes.
- Click Create Schema.
- Enter the following details for the schema:
- A unique name for the schema
- A description that defines the worktype
- Click Add Custom Attribute.
- Add the following two attributes with the specified field types and length of the field:
Attributes Field Type Length of the field sn_case_idSmall Text Field Minimum Length: 0
Maximum Length: 100sn_work_item_idSmall Text Field Minimum Length: 0
Maximum Length: 100 - Click Save.
Create a workbin
Workbins are asynchronous storage areas that belong to a division. Workitems are stored in the workbins.
- Click Admin.
- Under Work Automation, click Workbin. The workbin dashboard opens.
- Click Menu > Orchestration > Work Automation > Workbins. The workbin dashboard opens.
- Click Create New Workbin.
- Enter the following details:
- Name – A unique name for the workbin.
- Description – A description that describes the nature of workitems in the workbin.
- Division – Select the division to which the workbin must belong. Once set, you cannot change the division of a workbin.
- Click Save.
Define a worktype
The case details that must be processed and routed to the correct queue or agent are defined in the worktype.
- Click Admin.
- Under Work Automation, click Worktypes. The worktype dashboard opens.
- Click Menu > Orchestration > Work Automation > Worktypes. The worktype dashboard opens.
- Click Create New Worktype.
- Enter the following details:
- Name – A unique name for the worktype.
- Description – A description that best describes the purpose of the worktype.
- Workbin – Either select an existing workbin and the division or create a new workbin.
- Click Save.
You can modify the following settings of the worktype:
- Properties – Select the schema for the worktype. Choose the schema that you created with the custom attributes for ServiceNow.
- Routing – Enable routing to route cases of specific worktypes to a defined queue.
- Rules – To automate the actions of a workitem, create rules for a worktype and from Architect associate the worktype with a workitem flow.
Get the worktype Id
You require a worktype Id for setting the external routing of a queue in ServiceNow. To get the worktype Id in Genesys Cloud:
- Click Admin.
- Under Work Automation, click Worktypes. The worktype dashboard opens.
- Click Menu > Orchestration > Work Automation > Worktypes. The worktype dashboard opens.
- Select the worktype for which you want to get the Id.
- Examine the URL in your browser’s address bar. The URL is of the following format:
https://<Genesys_Cloud_region>.com/directory/#/admin/worktypes/37a4152c-xxxx-42a3-91e1-xxxxa930473a/summary
- Locate the worktype Id, which is a unique string of characters. For example, 37a4152c-xxxx-42a3-91e1-xxxxa930473a is the worktype Id in the specified URL.
For more information, see Defining a worktype.
- Log in to ServiceNow.
- Navigate to All > System Definitions > Tables.
- Click New.
- Enter the following information for the extended case table:
- Label – Enter the name of the table. The Name field is automatically generated from the value entered in the Label field.
- Extends table – Search and select Case [sn_customerservice_case] from the list.
- Select the Create Module option.
- (Optional) Under the Controls tab, select Auto-number as required.Note: Make note of the user role created under Create Access Controls. You will assign this role to the agents or groups.
- (Optional) Under the Application Access tab, select the following options:
- Can read
- Can create
- Can update
- Can delete
- Click Submit.
Set up and activate the service channel for case and case task in ServiceNow. For more information, see Create or configure a service channel.
- Log in to ServiceNow.
- Navigate to All > Service Channels.
- Click New.
- Enter the following information for the service channel:
- Name – Name of the service channel to be configured.
- Inbox Order – The order in which the service channel items appear in the agent inbox.
- Active – Select the option.
- Table – Select the extended case table created in the previous step from the list or select Case [sn_customerservice_case] from the list.
- Assign to field – Select Assigned to from the list.
- Assignment group field – Select Assignment group from the list.
- Under the Capacity and Utilization section, enter the following details:
- Default work item size – Enter 1 as the value.
- Default capacity – Enter 1 as the value.
- Utilization condition – Add the following conditions:
- State is one of New and Open
- Click Submit.
Before you create external queues in ServiceNow, create and configure queues in Genesys Cloud.
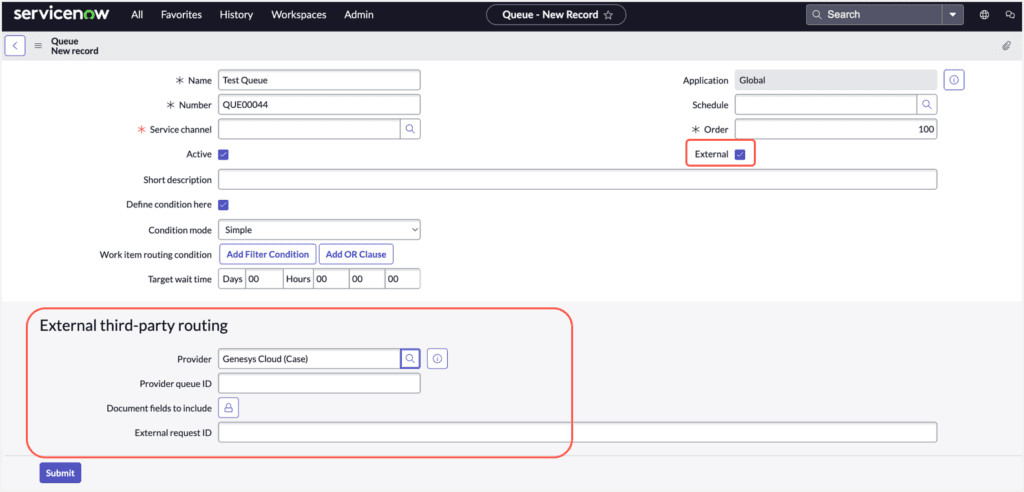
With the setup of Unified Experience from Genesys and ServiceNow integration, administrators must create queues in ServiceNow that are externally routed to Genesys Cloud. When you create a queue in ServiceNow, select the External option and enter the following information:
- Provider – Click the Lookup using list icon and select the external providers as follows:
- For case, select Genesys Cloud (Case).
- For case task, select Genesys Cloud (Workitem).
- Provider queue ID – Enter the Genesys Cloud queue ID. For more information, see How can I get the queue ID for my ServiceNow integration in Genesys Cloud?
- External request ID – Enter the worktype Id that you created for work automation in Genesys Cloud.
These queues can then be assigned to cases and case tasks in multiple ways. A case or case task is assigned to a queue based on the routing conditions, assignment group mappings, and optionally skills or other criteria.
For more information, see About Unified Experience from Genesys and ServiceNow.
[NEXT] Was this article helpful?
Get user feedback about articles.